
We have not tested these products. This comparison is reasoned from manufacturer specifications, documentation and warranty terms. How we test
If you buy through a link on this page we may earn a commission. Retailers do not pay for reviews or placement. Prices are shown as bands, never as figures — the live price is at the retailer. As an Amazon Associate I earn from qualifying purchases. How we make money
On this page
The short version
Split, tented and contoured — it addresses all three wrist angles at once.
See at Amazon — Kinesis Advantage360 (opens in a new tab)A true split with a standard layout, so the halves separate without relearning to type.
See at Amazon — Kinesis Freestyle2 for PC (opens in a new tab)Fixed-split and gently tented, and you can type on it from day one.
See at Amazon — Microsoft Sculpt Ergonomic Keyboard (opens in a new tab)“Ergonomic keyboard” covers three quite different interventions, and they address three different joints. Buying the wrong one for your problem is common and avoidable.
The three angles
Ulnar deviation — your wrists bending outward to reach a keyboard narrower than your shoulders. Fixed by splitting the halves so each hand sits at shoulder width.
Pronation — your forearms rotating to put your palms flat. Fixed by tenting, raising the inner edges so your hands angle inward.
Extension — your wrists bending upward over a thick keyboard. Fixed by a low profile and a negative tilt, not by a wrist rest.
Work out which one describes your discomfort before choosing, because a board that splits but does not tent will not help a pronation problem. The Kinesis Advantage360 (at Amazon, opens in a new tab) is our pick because it addresses all three at once.
Fixed split versus true split
A fixed split — one board, angled halves — gives you most of the ulnar correction with essentially no learning curve. It is by far the easiest recommendation to make, and the Microsoft Sculpt Ergonomic Keyboard (at Amazon, opens in a new tab) is the one we make.
A true split, two separate halves connected by a cable, lets you set the width and angle to your own shoulders and put an ergonomic mouse between them. It is better, and it costs you a fortnight of slow typing. Of the true splits, the Kinesis Freestyle2 for PC (at Amazon, opens in a new tab) is the one we would put on a small desk. The split keyboard guide separates the other axes — tenting, stagger, thumb clusters — that vendors tend to bundle together.
Be honest about the adaptation cost
Fully split, column-staggered boards genuinely disrupt your typing for one to two weeks. Most people who abandon them do so in that window. If you are going to switch, do it when you can afford to be slow.
The picks
 (opens Amazon in a new tab)
 - Band
- $$$$ Premium tier
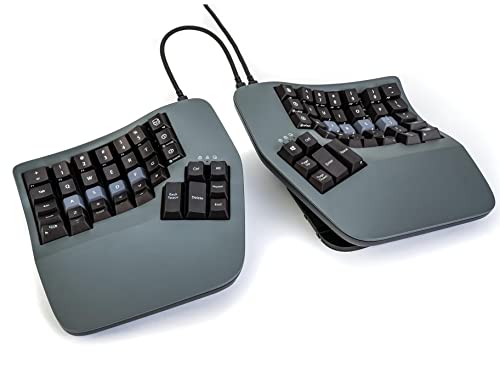
Kinesis Advantage360
Split, tented and contoured — it addresses all three wrist angles at once.
- Fully split halves set shoulder width
- Tenting addresses forearm rotation
- Concave key wells shorten finger travel
- Steep adaptation period
- Expensive
 (opens Amazon in a new tab)
 - Band
- $$ Mid tier
Kinesis Freestyle2 for PC
A true split with a standard layout, so the halves separate without relearning to type.
- Halves separate up to 9 inches
- Standard layout, no drivers needed
- Low-force keys
- Membrane switches
- Wired, and no remapping software
.jpg)
- Band
- $ Budget tier
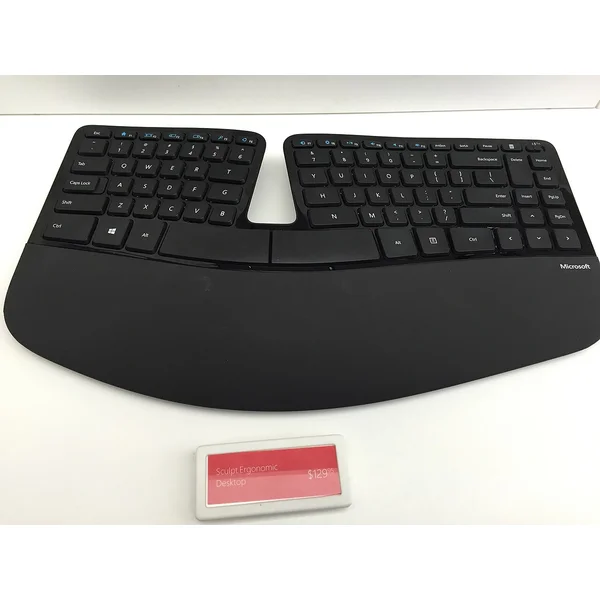
Microsoft Sculpt Ergonomic Keyboard
Fixed-split and gently tented, and you can type on it from day one.
- Almost no learning curve
- Gentle tenting included
- Costs a fraction of a true split
- Split angle is fixed
- Membrane switches, not mechanical
Questions people ask
How long does it take to adapt to a split keyboard?
For a fixed-split board like the Sculpt, essentially no time — the layout is a standard one, just angled. For a fully split, column-staggered board, expect your typing speed to drop substantially for one to two weeks and to take four to six weeks to fully recover. That is a real cost and it is the main reason people abandon these keyboards, so plan the switch for a quieter period.
What is tenting and do I need it?
Tenting raises the inner edges of the keyboard so your hands sit at an angle rather than flat, which reduces forearm pronation — the rotation required to put your palms flat on a desk. If your discomfort is in the forearm rather than the wrist, tenting is the feature that addresses it. If your discomfort is at the wrist joint itself, splitting matters more.
Are mechanical switches more ergonomic?
Not inherently. Switch type affects feel and sound, and the ergonomic argument for them is indirect: a switch that actuates before bottoming out lets you type with less force if you learn not to bottom out. That is a technique change more than a hardware one, and you can learn it on a membrane board too.
Kinesis Advantage360
Split, tented and contoured — it addresses all three wrist angles at once.